 |
||||||
| September 21, 2004
In This Issue of The Acid Staining Newsletter Decorative Epoxy Inlays
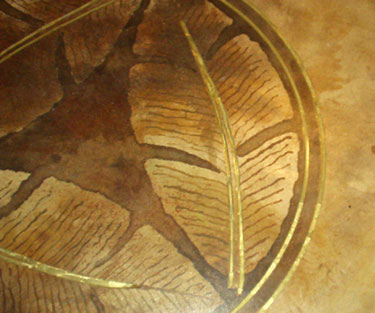
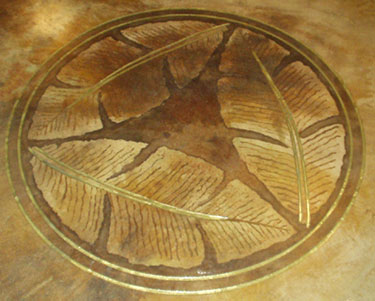
I just made some nice photos of a design we did on an office floor during our last seminar in June, so I will write about our “Three Feather Crest.” This was done during a seminar we held for experienced stainers; we were learning circular grinding techniques (for the epoxy inlay), using sealer as a resist, and faux painting for details. Our client wanted a fairly simple design with a Japanese flavor, so we went to one of my favorite design books, the
We first stained the background area of the floor with a pale version of Scofield’s Dark Walnut. We made a 10:1 dilution of muriatic acid (with ten parts being water) and then mixed this 2:1 with Dark Walnut. This usually gives us a nice paper bag tan with very little orange or yellow in it. Our slab was quite porous and over 30 years old, so it took the color with soft gradations. When our tan area was scrubbed and dry, we transferred our photo inside a circle about three feet in diameter. We had the one-inch original blown up at Kinko’s in a series of enlargements, then cut out one feather shape with scissors and traced it inside the circle three times. Chris Mirabal, who has all the Engrave-A-Crete cutting tools, mounted his grinder on a sort of roller skate platform with a radial arm extending to a smaller platform in the center of the circle. I stood on the central platform to keep it in place while he ground out both concentric circles of the frame. Each band was 3/8’s inch wide and about 1/8th inch in depth. He then removed the grinder from its platform and did the central shaft of each feather by hand. After vacuuming the dust away, our students painted clear acrylic sealer over each feather shape (the dark lines would come later over this sealer) to make them resist our next staining. It dried in 20 minutes and we could then brush on straight Dark Walnut with a
When the Dark Walnut areas were scrubbed and dry, we mixed a 2-part clear epoxy which sets up in 30 minutes (hobby shops carry this or you can purchase some from Engrave-A-Crete at 1-800-884-2114). We had bought some gold powder at an art supply store to stir into the epoxy. One can find all sorts of nice metallic powders at art stores, ranging from copper to silver. They remain suspended in the clear epoxy until it has set up and give a metallic sheen which is subdued by the epoxy, so it is never gaudy. This is dropped into the groove with a small tongue-depressor or coffee stirring stick. It flows to the edges of the groove and adheres well. When this had set up and cooled, we painted in the dark lines inside the feathers with artist’s acrylic paint and a small brush, then coated the entire floor, design and all, with 4 coats of Sheen C-40. This is a water-based acrylic sealer which we get at a janitorial supply store. It is made by Harvard Chemical Research Company (1-800-889-1880 or hcronline.com). We like it because each coat dries in about twenty minutes (here in
Happy Staining! GG Questions or comments about my newsletter? |
||||||
|
||||||