| January 26, 2005
The Kiwi Backpack Sprayer
Those of you who attended my first staining seminar will remember Roy Snowball who came from New Zealand and was a whiz with home-made stain formulas and micro toppings. He has chemical engineering in his past, so he can’t stop fiddling with stain chemicals and oxidizers, and is getting some of the most brilliant colors I have ever seen. Unfortunately, I do not understand enough about chemistry to write about those experiments here. All I can do is give him moral support from a distance.
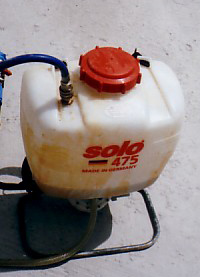
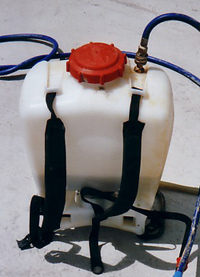
Roy recently wrote to me about another bit of Kiwi ingenuity which I can describe from his letter. He had a series of concrete rock walls to spray with stain, so he devised a backpack sprayer which he could put on and use in tandem with his compressor to get a nice, even spray on large vertical areas. The photos show the front and back sides of the altered sprayer. This is a 4-gallon pump-up sprayer which can be purchased at many garden stores or at Ace Hardware. It can be found on the web by searching under “Solo Backpack Sprayer.” His procedure went as follows:
First, buy a Solo backpack sprayer. You can use it in its original form as long as you don’t over pressurize it. If you do, the pump at the bottom blows out at waist height and you will fill your underwear with two gallons of stain. I can attest that this is not a pleasant experience!
So I took out the pump and removed the central regulating cylinder. The lower ring of the pump is fibreglassed into place and slid back on, siliconed and screwed with metal self-tapping screws. Buy a bulkhead male fitting and drill a compatible hole in the top of the sprayer next to the cap. Insert silicone and screw up. Put a female fitting onto that and a length of hose down to an on/off switch on the handle to control the pressure. Put a male fitting on the switch which connects to the compressor hose. I use 80-100 feet for mobility. Set the pump pressure at 30-40 p.s.i. The Solo setup is ideal except for the spray tip (fan type) which always blocks. I replaced it with a circular spray tip.
All the fittings for the air pipes are bought at air compressor supply stores. Here is the fitting sequence:
1. Drill hole in top of sprayer
2. Bolt in and silicone bulkhead fitting
3. Screw in male fitting to top of bulkhead fitting
4. Female fitting onto male and then approximately one yard of compressor hose clamped onto female fitting
5. Male fitting onto end of hose (clamped) also screwed onto on/off switch
6. Another male fitting on other end of on/off switch
7. Female fitting on compressor hose from compressor
8. Refit metal pump handle and clamp above system to it
Fill the sprayer (3-4 gallons). Start the compressor. Place sprayer on back and open on/off valve for 2-3 seconds until you feel the sprayer fill and then switch off. You are now ready to go.
|
|
As you know the main problem with vertical faces are runs. After a bit of experimentation I found the best way was to spray with the concrete dry. This way, it sucks in the stain and any runs can be solved by having a soft broom in your other hand, giving just a single wipe. I used the same system a second time to highlight the rocks in the grooves and a smaller sprayer for character marks.
When you first buy the sprayer it’s a temptation to leave it in its original form, as it seems logical. DO NOT DO THIS!
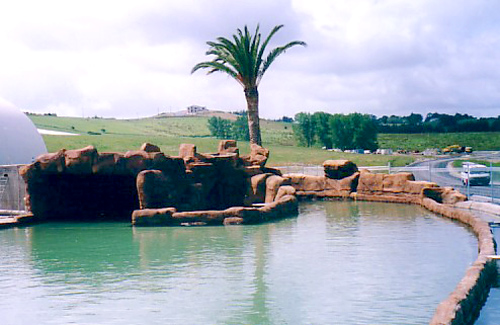
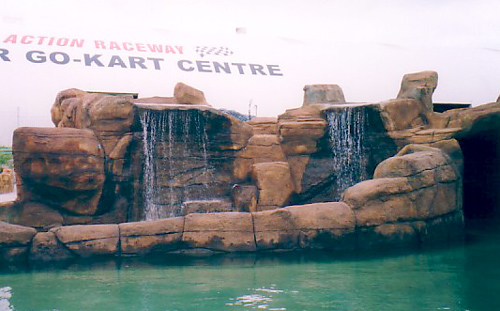
I hope my readers can look at the photos and understand this. I cannot say that I do completely. If you have questions, please go to the Forum on my website (www.gayegoodman.com) and address your queries to Roy. He will usually reply the next day, even though he is all the way ‘round the world in New Zealand. Roy sprayed several large rock groupings around some raceway ponds with this handy device.
Thanks very much, Roy!
Happy Staining!
|