 |
|||||||||
| October 5, 2004
In This Issue of The Acid Staining Newsletter Using Sealer as a Resist Many long years ago I became fascinated with the ancient Indonesian art of batik. This is a fabric printing and dyeing process in which hot melted wax is applied to the surface of cotton cloth as a “resist”. As soon as the wax penetrates the fabric and cools, you can immerse the cloth into a dye bath and everything BUT the waxed area will take the dye color. The cloth is rinsed and allowed to dry so that you can wax the areas you want to preserve as the first dye color and immerse the fabric in a second (darker) dye bath. This process can continue until the fabric painting contains five or six increasingly dark colors. There are two attractive by-products brought about by this technique. One is that as the fabric is crumpled to go into the dye bath, the thin layer of wax cracks and succeeding darker colors enter the cracks, creating a “crackle effect” – a fine webbing of dark lines across lighter areas of the composition. This is the hallmark of batik, by which it can always be recognized. The second by-product is that the colors in a batik painting are always harmonious with each other. This is because you have started light and added each transparent color over the preceding ones. This keeps them analogous, as artists say, or in the same family. I began my career as a batik artist and spent several years refining my version of it until becoming frustrated by the tedium of the process. Now that I am in the decorative concrete business, I find myself resurrecting certain aspects of the technique.
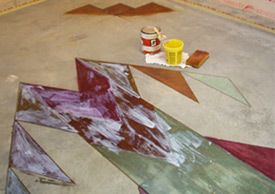
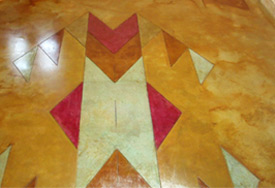
My crew is often presented with slabs which are too old to be gracefully saw cut, since concrete gets more brittle with age. We also do not have the equipment for saw cutting, so we usually do our decorative borders with masking tape, staining inside the border the first day, then moving the tape to the other side of the line and staining the central area of the floor the next day. This works well on smooth concrete, but on rough floors the stain will bleed under our tape no matter how well we press it down.
We stained the entire floor with Weathered Bronze the first day, since that was our lightest color. We then scrubbed it and left it to dry. As soon as we could walk on it, we snapped out border lines about twelve inches from each wall. We smoothed 3-M Professional 24-Hour masking tape down on the wall side of each borderline, just to act as a straight guide for our sealer application. We then brushed on a two or three-inch wide border of clear, water-based acrylic sealer (Scofield’s Cementone) along our taped line. (This would hold the edges of the center of the room at the Weathered Bronze color we wanted and we could later fill in the rest of the center with sealer when the whole floor was done). Due to seminar time constraints, we could only give the Cementone 30 minutes to cure, although the company recommends four hours when the whole floor is being sealed. At any rate, we were not standing on the resist areas, but could lean over them to remove our masking tape guideline and stain the border, from the resist to the wall with a darker color, laying “veins and rags” into it for varied texture. (The color we used was a mixture of Antique Amber and Padre Brown Chemstains by L. M. Scofield). We were happy to see that despite the bumpiness of the slab surface, we got a smooth, sharp borderline. My students had applied the resist perfectly. The next day we cleaned the brown border areas, let them dry, and applied two coats of Cementone Clear Sealer to the entire floor. We have since tried using our current favorite acrylic sealer as a resist (it’s a janitorial product called Sheen C-40 by Harvard Chemical Research, Inc.). While it works very well as a sealer, it does NOT work well as a resist, at least not to Triple S’ bright colored stains. Triple S claims that their colorful stains are true acid stains, but they bonded to this sealer just as though they were diluted acrylic paints. In any case, before depending on your sealer as a resist, you would be wise to try it on a sample and certainly do not do as I did and try it for the first time during a teaching seminar when you risk failing in front of everyone! Transcripts from my teleseminar A few months ago I held a teleseminar on acid staining to discuss what was new in the industry. We had a great time! Over 100 stainers, professionals and do-it-yourselfers alike, participated and we covered a lot of new information that can’t be found anywhere else. We discussed a few new products that are on the market, and some creative ways to use our trusted products in ways you have probably never thought of. We also covered some new artistic techniques that my crew and I have been developing that aren’t in any of my books yet. Everything will be included in the new version of my manual, due out later this year. However, I thought that those you who are going to be staining over the next few months might not want to wait until then to get this information. So I’ve had Bridgeworks take the transcripts from that call and turn them into an ebook. You can read it online and print it out in your home or office, or just have Bridgeworks send you a printed version. For more information, go to... http://www.bridgeworks.com/products/gg/020.html Also, I’ve considered continuing these teleseminars once or twice a year. I feel it is important for stainers to come together and share what new products and ideas they have discovered. If you would be interested, please let me know at www.askgayegoodman.com/feedback. Happy Staining!
GG Questions or comments about my newsletter? |
|||||||||
|
|||||||||